Difference between revisions of "Coral from Google/Introduction/Getting Started"
(→Connect the board to the internet) |
m |
||
| (26 intermediate revisions by 6 users not shown) | |||
| Line 1: | Line 1: | ||
<noinclude> | <noinclude> | ||
| − | {{Google | + | {{Coral from Google/Head|next=Introduction/SoM_Overview|previous=Introduction|metakeywords=}} |
</noinclude> | </noinclude> | ||
| Line 7: | Line 7: | ||
--> | --> | ||
| − | The following guide is based on the [https://coral.ai/docs/dev-board/get-started | + | The following guide is based on the official Coral Dev board [https://coral.ai/docs/dev-board/get-started Getting Started Guide]. |
| − | + | <br> | |
| − | = Hardware requirements = | + | <br> |
| + | == Hardware requirements == | ||
Besides the Coral Dev board, you need the following hardware: | Besides the Coral Dev board, you need the following hardware: | ||
| Line 19: | Line 20: | ||
* Ethernet cable or Wi-Fi connection | * Ethernet cable or Wi-Fi connection | ||
| − | = Software requirements = | + | == Software requirements == |
1. '''Install a console serial program''', such as ''screen'', ''picocom'' or ''minicom''. | 1. '''Install a console serial program''', such as ''screen'', ''picocom'' or ''minicom''. | ||
| Line 25: | Line 26: | ||
2. '''Install the latest version of the ''fastboot'' tool'''. | 2. '''Install the latest version of the ''fastboot'' tool'''. | ||
| − | Download it from the [https://developer.android.com/studio/releases/platform-tools#downloads Android SDK Platform-tools] and then run the following commands: | + | {{download}} Download it from the [https://developer.android.com/studio/releases/platform-tools#downloads Android SDK Platform-tools] and then run the following commands: |
| − | < | + | <syntaxhighlight lang=bash> |
mkdir -p ~/.local/bin | mkdir -p ~/.local/bin | ||
sudo mv ~/Downloads/platform-tools/fastboot ~/.local/bin/ | sudo mv ~/Downloads/platform-tools/fastboot ~/.local/bin/ | ||
| − | </ | + | </syntaxhighlight> |
To verify the installation run the following: | To verify the installation run the following: | ||
| − | < | + | <syntaxhighlight lang=bash> |
fastboot --version | fastboot --version | ||
| − | </ | + | </syntaxhighlight> |
3. '''Install the Mendel Development Tool (MDT)'''. | 3. '''Install the Mendel Development Tool (MDT)'''. | ||
| Line 43: | Line 44: | ||
This is the tool that will be used to connect with the Dev board. To install it, run this command: | This is the tool that will be used to connect with the Dev board. To install it, run this command: | ||
| − | < | + | <syntaxhighlight lang=bash> |
pip3 install --user mendel-development-tool | pip3 install --user mendel-development-tool | ||
| − | </ | + | </syntaxhighlight> |
| − | = Flash the board = | + | == Flash the board == |
Before proceeding to the flash of the board, first verify the following: | Before proceeding to the flash of the board, first verify the following: | ||
| Line 57: | Line 58: | ||
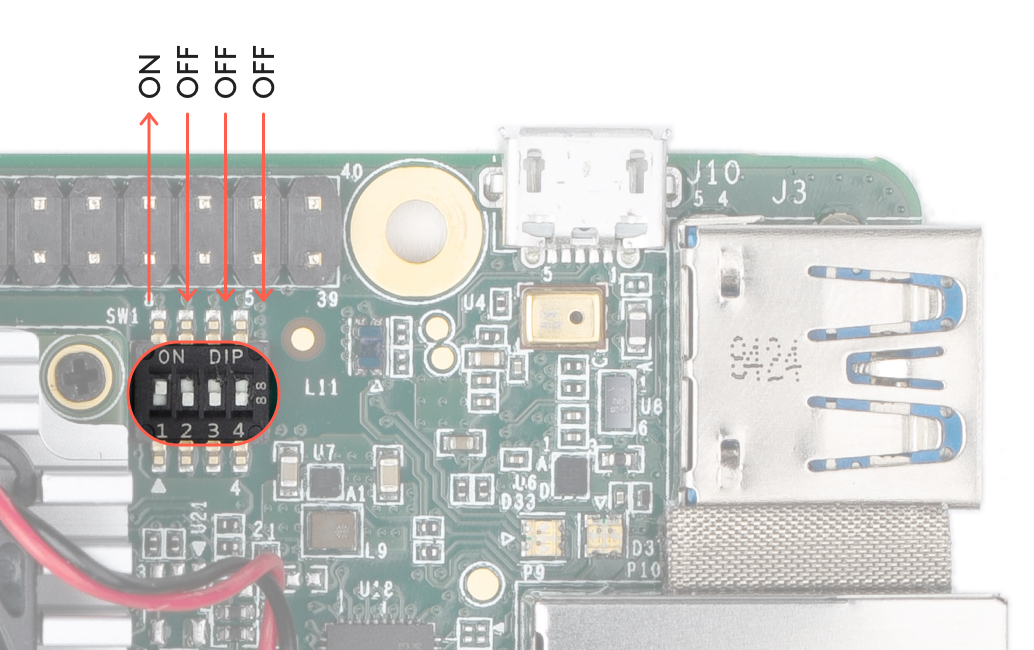
[[File:Emmc mode.jpg|thumb|center|500px|Boot switches for the eMMC mode. Image taken from: https://coral.ai/static/docs/images/devboard/devboard-bootmode-emmc.jpg]] | [[File:Emmc mode.jpg|thumb|center|500px|Boot switches for the eMMC mode. Image taken from: https://coral.ai/static/docs/images/devboard/devboard-bootmode-emmc.jpg]] | ||
| − | == Initiate fastboot mode == | + | === Initiate fastboot mode === |
| − | If your dev board was manufactured after April 10, 2019; you can skip the ''fastboot'' initiate. For more details about how to verify the manufacturing date, see [https://coral.ai/docs/dev-board/ | + | If your dev board was manufactured after April 10, 2019; you can skip the ''fastboot'' initiate. For more details about how to verify the manufacturing date, see [https://coral.ai/docs/dev-board/reflash/#initiate-fastboot this guide]. |
1. '''Install the udev rule or driver on your host computer'''. | 1. '''Install the udev rule or driver on your host computer'''. | ||
| − | < | + | <syntaxhighlight lang=bash> |
sudo sh -c "echo 'SUBSYSTEM==\"usb\", ATTR{idVendor}==\"0525\", MODE=\"0664\", \ | sudo sh -c "echo 'SUBSYSTEM==\"usb\", ATTR{idVendor}==\"0525\", MODE=\"0664\", \ | ||
GROUP=\"plugdev\", TAG+=\"uaccess\"' >> /etc/udev/rules.d/65-edgetpu-board.rules" | GROUP=\"plugdev\", TAG+=\"uaccess\"' >> /etc/udev/rules.d/65-edgetpu-board.rules" | ||
sudo udevadm control --reload-rules && sudo udevadm trigger | sudo udevadm control --reload-rules && sudo udevadm trigger | ||
| − | </ | + | </syntaxhighlight> |
2. '''Connect to the serial console'''. | 2. '''Connect to the serial console'''. | ||
| − | 3. '''Connect to the board via de serial program'''. In this case we will be using the ''screen'' program. | + | 3. '''Connect to the board via de serial program'''. In this case, we will be using the ''screen'' program. |
Determine the dive name for the serial connection: | Determine the dive name for the serial connection: | ||
| − | < | + | <syntaxhighlight lang=bash> |
dmesg | grep ttyUSB | dmesg | grep ttyUSB | ||
| − | </ | + | </syntaxhighlight> |
Then, connect via serial: | Then, connect via serial: | ||
| − | < | + | <syntaxhighlight lang=bash> |
screen /dev/ttyUSB0 115200 | screen /dev/ttyUSB0 115200 | ||
| − | </ | + | </syntaxhighlight> |
4. '''Power the board'''. | 4. '''Power the board'''. | ||
| Line 91: | Line 92: | ||
From your serial connection prompt, run the following: | From your serial connection prompt, run the following: | ||
| − | < | + | <syntaxhighlight lang=bash> |
fastboot 0 | fastboot 0 | ||
| − | </ | + | </syntaxhighlight> |
Now, ''fastboot'' is initiated int the board and is waiting for the host computer to start the flashing process. | Now, ''fastboot'' is initiated int the board and is waiting for the host computer to start the flashing process. | ||
| Line 99: | Line 100: | ||
6. '''Disconnect the serial console'''. | 6. '''Disconnect the serial console'''. | ||
| − | ==Execute the flash script== | + | ===Execute the flash script=== |
1. '''Connect the USB-C cable''' to the port labeled OTG. | 1. '''Connect the USB-C cable''' to the port labeled OTG. | ||
| Line 105: | Line 106: | ||
2. '''Verify ''fastboot'' sees your board'''. | 2. '''Verify ''fastboot'' sees your board'''. | ||
| − | < | + | <syntaxhighlight lang=bash> |
fastboot devices | fastboot devices | ||
| − | </ | + | </syntaxhighlight> |
You should see the number of your device printed. | You should see the number of your device printed. | ||
| Line 113: | Line 114: | ||
3. '''Download and flash the system image'''. | 3. '''Download and flash the system image'''. | ||
| − | < | + | <syntaxhighlight lang=bash> |
cd ~/Downloads | cd ~/Downloads | ||
| − | curl -O https:// | + | curl -O https://mendel-linux.org/images/enterprise/eagle/enterprise-eagle-20200724205123.zip |
| − | unzip | + | unzip enterprise-eagle-20200724205123.zip \ |
| − | && cd | + | && cd enterprise-eagle-20200724205123 |
bash flash.sh | bash flash.sh | ||
| − | </ | + | </syntaxhighlight> |
It will take around 5 minutes to complete the flashing process and then, the board reboots. | It will take around 5 minutes to complete the flashing process and then, the board reboots. | ||
| − | = Connect to the board's shell via MDT = | + | == Connect to the board's shell via MDT == |
In your terminal, make sure that MDT can see your board running the following command: | In your terminal, make sure that MDT can see your board running the following command: | ||
| + | <syntaxhighlight lang=bash> | ||
| + | mdt devices | ||
| + | </syntaxhighlight> | ||
| + | |||
| + | You should see your device name and IP address. Then run the following: | ||
| + | |||
| + | <syntaxhighlight lang=bash> | ||
| + | mdt shell | ||
| + | </syntaxhighlight> | ||
| + | |||
| + | Now you should be connected to the board's prompt shell. | ||
| + | |||
| + | == Connect the board to the internet == | ||
| + | |||
| + | You can either connect an Ethernet cable to the board or configure the wifi connection with the following command: | ||
| + | <syntaxhighlight lang=bash> | ||
| + | nmtui | ||
| + | </syntaxhighlight> | ||
| + | |||
| + | Select '''Activate a connection''' and select the corresponding network from the list. | ||
| + | <br> | ||
| + | [[File:Nmtui.png|800px|center|thumb|Network manager menu]] | ||
| + | |||
| + | == Update Mendel software == | ||
| + | |||
| + | To update this software run the following command: | ||
| + | |||
| + | <syntaxhighlight lang=bash> | ||
| + | sudo apt-get update | ||
| + | |||
| + | sudo apt-get dist-upgrade | ||
| + | </syntaxhighlight> | ||
| + | |||
| + | To install TensorFlow Lite Python runtime: | ||
| + | |||
| + | <syntaxhighlight lang=bash> | ||
| + | pip3 install https://dl.google.com/coral/python/tflite_runtime-2.1.0.post1-cp37-cp37m-linux_aarch64.whl | ||
| + | </syntaxhighlight> | ||
| + | |||
| + | == Run the Coral demo == | ||
| + | |||
| + | Now you are ready to run a demo application of MobileNet optimized to run on the Edge TPU. To run this demo run the following command: | ||
| + | |||
| + | <syntaxhighlight lang=bash> | ||
| + | edgetpu_demo --stream | ||
| + | </syntaxhighlight> | ||
| + | |||
| + | Once the demo is running on the board, open the browser on your host machine a go to this link: '''192.168.100.2:4664''' | ||
| + | |||
| + | == Run a model using the TensorFlow Lite API == | ||
| + | |||
| + | Download the example code from GitHub: | ||
| + | <syntaxhighlight lang=bash> | ||
| + | sudo apt-get install git | ||
| + | |||
| + | mkdir coral && cd coral | ||
| + | |||
| + | git clone https://github.com/google-coral/tflite.git | ||
| + | </syntaxhighlight> | ||
| + | |||
| + | Download the bird classifier model, labels file, and a bird photo: | ||
| + | <syntaxhighlight lang=bash> | ||
| + | cd tflite/python/examples/classification | ||
| + | |||
| + | bash install_requirements.sh | ||
| + | </syntaxhighlight> | ||
| + | |||
| + | Run the image classifier with the bird photo: | ||
| + | <syntaxhighlight lang=bash> | ||
| + | python3 classify_image.py \ | ||
| + | --model models/mobilenet_v2_1.0_224_inat_bird_quant_edgetpu.tflite \ | ||
| + | --labels models/inat_bird_labels.txt \ | ||
| + | --input images/parrot.jpg | ||
| + | </syntaxhighlight> | ||
| + | == How to recompile kernel == | ||
| + | First create a directory to download the python script used to download the source code | ||
| + | <pre> | ||
| + | mkdir -p <PATH_SCRIPT> | ||
| + | export PATH=$PATH:PATH_SCRIPT | ||
| + | curl https://storage.googleapis.com/git-repo-downloads/repo > PATH_SCRIPT/repo | ||
| + | chmod a+x PATH_SCRIPT/repo | ||
| + | </pre> | ||
| + | |||
| + | Now go to where the script was downloaded and run the repo script to initialize the code | ||
<pre> | <pre> | ||
| − | + | cd PATH_SCRIPT | |
| + | repo init -u https://coral.googlesource.com/manifest | ||
| + | repo init -u https://coral.googlesource.com/manifest -m excelsior.xml | ||
| + | repo sync -j$(nproc) | ||
</pre> | </pre> | ||
| − | + | Install the dependencies to build the kernel | |
<pre> | <pre> | ||
| − | + | sudo apt-get install qemu-user-static | |
| + | sudo apt-get install docker.io | ||
| + | sudo adduser $USER docker | ||
| + | sudo apt-get install android-tools-adb android-tools-fastboot | ||
| + | sudo apt-get install build-essential qemu-user-static bc | ||
</pre> | </pre> | ||
| − | Now | + | Now use the source and build the kernel |
| + | |||
| + | <pre> | ||
| + | source build/setup.sh | ||
| + | m docker-linux-imx | ||
| + | </pre> | ||
| − | + | You are going to see in the output of the process the following lines, these are the packages that you can install on the board. | |
| − | |||
<pre> | <pre> | ||
| − | + | dpkg-deb: building package 'linux-headers-4.14.98-imx' in '../linux-headers-4.14.98-imx_12-4_arm64.deb'. | |
| + | dpkg-deb: building package 'linux-kbuild-4.14.98-imx-dbgsym' in '../linux-kbuild-4.14.98-imx-dbgsym_12-4_arm64.deb'. | ||
| + | dpkg-deb: building package 'linux-kbuild-4.14.98-imx' in '../linux-kbuild-4.14.98-imx_12-4_arm64.deb'. | ||
| + | dpkg-deb: building package 'linux-image-4.14.98-imx' in '../linux-image-4.14.98-imx_12-4_arm64.deb'. | ||
</pre> | </pre> | ||
| − | + | To install the new kernel you can run the following commands | |
| + | <pre> | ||
| + | j product | ||
| + | cd packages/bsp/ | ||
| + | mdt install ./linux-image-<version>-imx_<version>_arm64.deb | ||
| + | </pre> | ||
<noinclude> | <noinclude> | ||
| − | {{Google | + | {{Coral from Google/Foot|Introduction|Introduction/SoM_Overview}} |
</noinclude> | </noinclude> | ||
Latest revision as of 14:28, 28 August 2023
| Coral from Google | |
|---|---|
Error creating thumbnail: Unable to save thumbnail to destination | |
| Introduction | |
|
|
|
| GStreamer | |
|
|
|
| GstInference | |
|
|
|
| Camera Drivers | |
|
|
|
| Reference Documentation | |
| Contact Us |
The following guide is based on the official Coral Dev board Getting Started Guide.
Contents
Hardware requirements
Besides the Coral Dev board, you need the following hardware:
- Linux or Mac computer
- USB-A to USB-micro-B cable (to connect your PC to the board's serial port)
- USB-A to USB-C cable (to connect your PC to the board's data port)
- 2 - 3A (5V) USB Type-C power supply (such as a phone charger)
- Ethernet cable or Wi-Fi connection
Software requirements
1. Install a console serial program, such as screen, picocom or minicom.
2. Install the latest version of the fastboot tool.
![]() Download it from the Android SDK Platform-tools and then run the following commands:
Download it from the Android SDK Platform-tools and then run the following commands:
mkdir -p ~/.local/bin

sudo mv ~/Downloads/platform-tools/fastboot ~/.local/bin/
To verify the installation run the following:
fastboot --version
3. Install the Mendel Development Tool (MDT).
This is the tool that will be used to connect with the Dev board. To install it, run this command:
pip3 install --user mendel-development-tool
Flash the board
Before proceeding to the flash of the board, first verify the following:
- The board is unplugged from the power and your computer.
- The boot mode switches are set to eMMC mode.

Initiate fastboot mode
If your dev board was manufactured after April 10, 2019; you can skip the fastboot initiate. For more details about how to verify the manufacturing date, see this guide.
1. Install the udev rule or driver on your host computer.
sudo sh -c "echo 'SUBSYSTEM==\"usb\", ATTR{idVendor}==\"0525\", MODE=\"0664\", \
GROUP=\"plugdev\", TAG+=\"uaccess\"' >> /etc/udev/rules.d/65-edgetpu-board.rules"

sudo udevadm control --reload-rules && sudo udevadm trigger
2. Connect to the serial console.
3. Connect to the board via de serial program. In this case, we will be using the screen program.
Determine the dive name for the serial connection:
dmesg | grep ttyUSB
Then, connect via serial:
screen /dev/ttyUSB0 115200
4. Power the board.
5. Start fastboot.
From your serial connection prompt, run the following:
fastboot 0
Now, fastboot is initiated int the board and is waiting for the host computer to start the flashing process.
6. Disconnect the serial console.
Execute the flash script
1. Connect the USB-C cable to the port labeled OTG.
2. Verify fastboot sees your board.
fastboot devices
You should see the number of your device printed.
3. Download and flash the system image.
cd ~/Downloads

curl -O https://mendel-linux.org/images/enterprise/eagle/enterprise-eagle-20200724205123.zip

unzip enterprise-eagle-20200724205123.zip \
&& cd enterprise-eagle-20200724205123

bash flash.sh
It will take around 5 minutes to complete the flashing process and then, the board reboots.
Connect to the board's shell via MDT
In your terminal, make sure that MDT can see your board running the following command:
mdt devices
You should see your device name and IP address. Then run the following:
mdt shell
Now you should be connected to the board's prompt shell.
Connect the board to the internet
You can either connect an Ethernet cable to the board or configure the wifi connection with the following command:
nmtui
Select Activate a connection and select the corresponding network from the list.

Update Mendel software
To update this software run the following command:
sudo apt-get update

sudo apt-get dist-upgrade
To install TensorFlow Lite Python runtime:
pip3 install https://dl.google.com/coral/python/tflite_runtime-2.1.0.post1-cp37-cp37m-linux_aarch64.whl
Run the Coral demo
Now you are ready to run a demo application of MobileNet optimized to run on the Edge TPU. To run this demo run the following command:
edgetpu_demo --stream
Once the demo is running on the board, open the browser on your host machine a go to this link: 192.168.100.2:4664
Run a model using the TensorFlow Lite API
Download the example code from GitHub:
sudo apt-get install git

mkdir coral && cd coral

git clone https://github.com/google-coral/tflite.git
Download the bird classifier model, labels file, and a bird photo:
cd tflite/python/examples/classification

bash install_requirements.sh
Run the image classifier with the bird photo:
python3 classify_image.py \
--model models/mobilenet_v2_1.0_224_inat_bird_quant_edgetpu.tflite \
--labels models/inat_bird_labels.txt \
--input images/parrot.jpg
How to recompile kernel
First create a directory to download the python script used to download the source code
mkdir -p <PATH_SCRIPT>
export PATH=$PATH:PATH_SCRIPT
curl https://storage.googleapis.com/git-repo-downloads/repo > PATH_SCRIPT/repo
chmod a+x PATH_SCRIPT/repo
Now go to where the script was downloaded and run the repo script to initialize the code
cd PATH_SCRIPT
repo init -u https://coral.googlesource.com/manifest
repo init -u https://coral.googlesource.com/manifest -m excelsior.xml
repo sync -j$(nproc)
Install the dependencies to build the kernel
sudo apt-get install qemu-user-static
sudo apt-get install docker.io
sudo adduser $USER docker
sudo apt-get install android-tools-adb android-tools-fastboot
sudo apt-get install build-essential qemu-user-static bc
Now use the source and build the kernel
source build/setup.sh
m docker-linux-imx
You are going to see in the output of the process the following lines, these are the packages that you can install on the board.
dpkg-deb: building package 'linux-headers-4.14.98-imx' in '../linux-headers-4.14.98-imx_12-4_arm64.deb'.
dpkg-deb: building package 'linux-kbuild-4.14.98-imx-dbgsym' in '../linux-kbuild-4.14.98-imx-dbgsym_12-4_arm64.deb'.
dpkg-deb: building package 'linux-kbuild-4.14.98-imx' in '../linux-kbuild-4.14.98-imx_12-4_arm64.deb'.
dpkg-deb: building package 'linux-image-4.14.98-imx' in '../linux-image-4.14.98-imx_12-4_arm64.deb'.
To install the new kernel you can run the following commands
j product
cd packages/bsp/
mdt install ./linux-image-<version>-imx_<version>_arm64.deb