GstWebRTC - PubNub Web Pages - x86
| GstWebRTC | ||||||||
|---|---|---|---|---|---|---|---|---|
 | ||||||||
| WebRTC Fundamentals | ||||||||
| GstWebRTC Basics | ||||||||
|
||||||||
| Evaluating GstWebRTC | ||||||||
| Getting the code | ||||||||
| Building GstWebRTC | ||||||||
| Examples | ||||||||
|
||||||||
| MCU Demo Application | ||||||||
| Contact Us |
This page shows a series of pipelines to try out the experimental PubNub support on x86 platform.
|
|
Contents
PubNub Demo Pages
PubNub offers a few test web pages to try out the WebRTC signalers.
- https://webrtc.ridgerun.com:7443
- http://webrtc.ridgerun.com:7080
- https://kevingleason.me/SimpleRTC/minivid.html
- https://www.pubnub.com/developers/demos/webrtc/
These examples are such that audio+video is required in both ways.
PubNub's WebRTC page
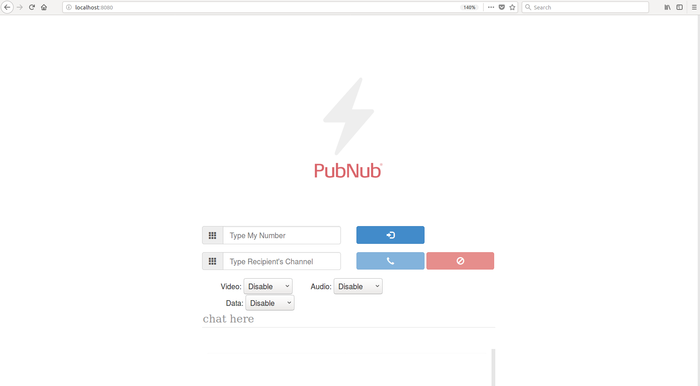
WebRTC provides a PubNub page that does not require audio+video streaming in both ways. It allows the selection of sending or receiving (or both): only video, only audio and audio+video. You can access the PubNub WebRTC page from here https://webrtc.ridgerun.com:7443/. Also you can access using your localhost like in the following example, the port is defined as 8080:
cd gst-webrtc/tests/examples/signalers/pubnub
python3 -m http.server 8080
The following show how to establish a call using the PubNub's WebRTC page in https://localhost:8080 (Select the port you defined)
- Type a unique name in the top text bar.
- Type the pipeline name in the bottom text bar.
- Select video and audio options: Disable, Send only, Receive only or Send-Receive.
- Select Data: Send-Receive or Disable
- Select Register button.
- Start the call from the pipeline or selecting the call button on the Webpage.
Note: In the following examples, the start-call property on the pipeline is set to false, thus you have to start the call from the website pressing the correct button. If start-call is set to true, the pipeline starts the call.
SimpleRTC WebPage
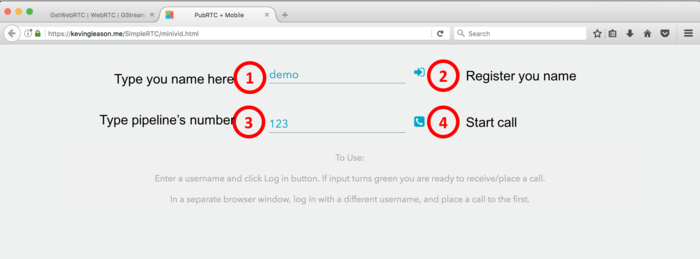
The following figure show how to establish a call using the SimpleRTC web page in https://kevingleason.me/SimpleRTC/minivid.html
- Type a unique name in the top text bar.
- Register that unique name to PubNub
- Type the pipeline name in the bottom text bar. In the examples 123 this would be $USER_CHANNEL or 123
- Start the call
PubNub Official Demo
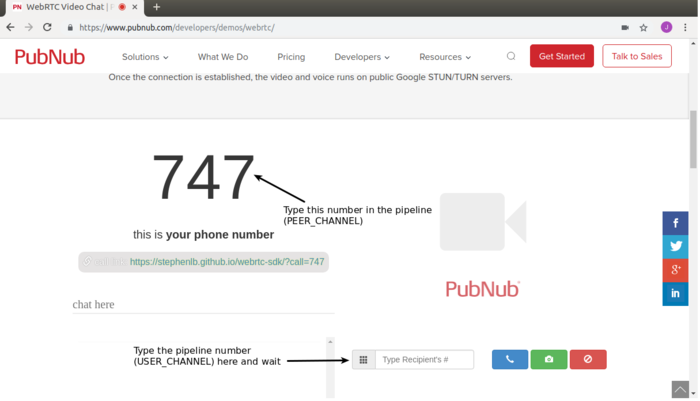
The following figure show hows to establish a call using the official PubNub's WebRTC demo in https://www.pubnub.com/developers/demos/webrtc/
Follow these steps
- Make sure to type the number above the message "this is your phone number" in the pipeline description
- Just type the pipeline's name in the bottom text bar. In the examples 123 this would be $USER_CHANNEL or 123, don't press any of the other buttons
- Launch the pipeline, the call should start right away (in Chrome), a couple of seconds at most (in Firefox).
VP8
Send/receive (VP8)
GST_DEBUG=3 gst-launch-1.0 rrwebrtcbin rtcp-mux=true start-call=true signaler::user-channel=$USER_CHANNEL signaler::peer-channel=$PEER_CHANNEL name=web videotestsrc is-live=true ! "video/x-raw, width=(int)640, height=(int)480, format=(string)I420, framerate=(fraction)30/1" ! vp8enc ! rtpvp8pay ! web.video_sink web.video_src ! rtpvp8depay ! avdec_vp8 ! xvimagesink
Send only (VP8)
GST_DEBUG=3 gst-launch-1.0 rrwebrtcbin rtcp-mux=true start-call=true signaler::user-channel=$USER_CHANNEL signaler::peer-channel=$PEER_CHANNEL name=web videotestsrc is-live=true ! "video/x-raw, width=(int)640, height=(int)480, format=(string)I420, framerate=(fraction)30/1" ! vp8enc ! rtpvp8pay ! web.video_sink
Receive only (VP8)
GST_DEBUG=3 gst-launch-1.0 rrwebrtcbin rtcp-mux=true start-call=true signaler::user-channel=$USER_CHANNEL signaler::peer-channel=$PEER_CHANNEL name=web web.video_src ! rtpvp8depay ! avdec_vp8 ! xvimagesink
H.264
Send/receive (H.264)
GST_DEBUG=3 gst-launch-1.0 rrwebrtcbin rtcp-mux=true start-call=true signaler::user-channel=$USER_CHANNEL signaler::peer-channel=$PEER_CHANNEL name=web videotestsrc is-live=true ! x264enc aud=false key-int-max=1 tune=zerolatency intra-refresh=true ! rtph264pay ! web.video_sink web.video_src ! rtph264depay ! h264parse ! avdec_h264 ! autovideosink
Send only (H.264)
GST_DEBUG=3 gst-launch-1.0 rrwebrtcbin rtcp-mux=true start-call=true signaler::user-channel=123 signaler::peer-channel=471 name=web videotestsrc is-live=true ! x264enc aud=false key-int-max=1 tune=zerolatency intra-refresh=true ! rtph264pay ! web.video_sink
Receive only (H.264)
GST_DEBUG=3 gst-launch-1.0 rrwebrtcbin rtcp-mux=true start-call=true signaler::user-channel=123 signaler::peer-channel=683 name=web web.video_src ! rtph264depay ! h264parse ! avdec_h264 ! autovideosink
H264+Opus Send+Receive
Example
This pipeline will encode a video and audio streams to H264 and OPUS accordingly and send them to the demo web page. Additionally, it will receive the web page's video and audio feeds, in the same format.
x264
It seems that browsers do not get along with x264 because of SEI NAL units sent with the stream. As a workaround, we set key-int-max=1 and avoid the SEI insertions.
USER_CHANNEL=123
gst-launch-1.0 rrwebrtcbin rtcp-mux=true start-call=false signaler::user-channel=$USER_CHANNEL name=web \
videotestsrc is-live=true ! x264enc aud=false key-int-max=1 tune=zerolatency intra-refresh=true ! "video/x-h264,profile=constrained-baseline,level=(string)3.1" ! \
rtph264pay ! web.video_sink \
audiotestsrc is-live=true ! opusenc ! rtpopuspay ! web.audio_sink \
web.video_src ! rtph264depay ! h264parse ! avdec_h264 ! autovideosink \
web.audio_src ! rtpopusdepay ! opusdec ! autoaudiosink
OpenH264
USER_CHANNEL=123
gst-launch-1.0 rrwebrtcbin rtcp-mux=true start-call=false signaler::user-channel=$USER_CHANNEL name=web \
videotestsrc is-live=true ! openh264enc ! \
rtph264pay ! web.video_sink \
audiotestsrc is-live=true ! opusenc ! rtpopuspay ! web.audio_sink \
web.video_src ! rtph264depay ! h264parse ! avdec_h264 ! autovideosink \
web.audio_src ! rtpopusdepay ! opusdec ! autoaudiosink
VP8+Opus Send+Receive
Example
This pipeline will encode a video and audio streams to VP8 and OPUS respectively and send them to the demo web page. Additionally, it will receive the web page's video and audio feeds, in the same format.
USER_CHANNEL=123
gst-launch-1.0 rrwebrtcbin rtcp-mux=true start-call=false signaler::user-channel=$USER_CHANNEL name=web \
videotestsrc is-live=true ! vp8enc ! rtpvp8pay ! web.video_sink \
audiotestsrc is-live=true ! opusenc ! rtpopuspay ! web.audio_sink \
web.video_src ! rtpvp8depay ! avdec_vp8 ! autovideosink \
web.audio_src ! rtpopusdepay ! opusdec ! autoaudiosink


