OmniVision OV5647 Linux driver for Jetson TX2 (Auvidea J120)
|
|
|
|
|
Omnivision OV5647 image sensor features
The Omnivision OV5647 is a CMOS image sensor with the following features:
- Automatic image control functions:
- Automatic exposure control (AEC)
- Automatic white balance (AWB)
- Automatic band filter (ABF)
- Automatic 50/60 Hz luminance detection
- Automatic black level calibration (ABLC)
- Image quality controls: lens correction, defective pixel canceling
- CSI2 serial data output (MIPI interface 2 lanes)
- Support for output formats: 8-/10-bit raw RGB data
- Maximum image transfer rate:
- QSXGA "Mpixel" (2592 x 1944): 15 fps
- 1080p: 30 fps
- 960p: 45 fps
- 720p: 60 fps
- VGA (640 x 480): 90 fps
- QVGA (320 x 240): 120 fps
Driver OV5647 Features
The current version of the driver only supports the following transfer rates:
- 1920x1080: 30 fps
- 1280x720: 30 fps
Driver V4l2 controls
Test pattern
Configure the test pattern.
Values:
- 0: Normal capture (Disable test pattern)
- 1: Color bar type 1
- 2: Color bar type 2
- 3: Random data
- 4: Square
Example:
v4l2-ctl --set-ctrl=test_pattern=1
Mode Control
Configure Total Vertical Size (VTS), Auto Gain Control (AGC), Auto Exposure Control (AEC).
Value
- Bit 1: controls AEC, 0: Auto, 1: Manual
- Bit 2: controls AGC, 0: Auto, 1: Manual
- Bit 3: controls VTS, 0: Auto, 1: Manual
Example:
# VTS:Auto, AGC:Auto, AEC:Auto
v4l2-ctl --set-ctrl=mode_ctrl=0
# VTS:Auto, AGC:Manual, AEC:Auto
v4l2-ctl --set-ctrl=mode_ctrl=2
# VTS:Auto, AGC:Auto, AEC:Manual
ov5647_set_mode_ctrl: val: 1
Gain Control
Configure the red, green, blue value
Range 0 - 4095
Example:
v4l2-ctl --set-ctrl=gain_red=500
v4l2-ctl --set-ctrl=gain_green=1000
v4l2-ctl --set-ctrl=gain_blue=1500
More can be added if required by the customer.
Auvidea J120 carrier board features
The J120 carrier board turns the Jetson TX2 compute module into a super-mini-computer for desktop usage and for integration into UAVs and drones.
- It is very compact.
- It has the same height as the TX1 (50 mm) and extends to one side to make space for standard connectors for Gigabit Ethernet, two USB 3 type A and mini HDMI.
- It features one M.2 type M slot for ultra-fast SSDs (2280 form factor) which is connected via 4 PCIe lanes to achieve a read and write performance up to 2500 Mbyte/s.
- One 4 lane CSI-2 (22 pin FPC 0.5mm pitch) – may connect to B102 module (up to 1080p60 input)
- Integrated 9 axis IMU (MPU-9250)
- 10 pin connector for I2C and 2 channel SPI
- I2S digital audio (6 pins)
- 6 pin connector for external reset, power, force recovery, and sleep switches
- 3 switches: reset, power, and force recovery
- JTAG pads (1.25mm pitch)
Hardware requirements
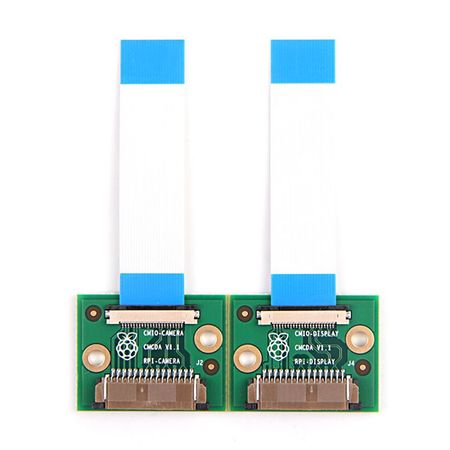
As the J120 features a 4 lane CSI-2 (22 pin FPC 0.5mm pitch), a 22 to 15 pin adapter must be used to connect the ov5647 camera to the board. The CMCDA V1.1 adapter could be used, but it is important to note the difference between the display and camera versions of the adapter, as they have different pinouts. The required model is the camera version (left one on the following image).
Enabling the driver
Follow these instructions to build and install the kernel image and device tree.
1. Install dependencies
The first step is to install some important dependencies, make sure you have installed this before compile the kernel sources.
$ sudo apt install build-essential bc bzip2 xz-utils git-core vim-common
2. Download and install the Toolchain
NVIDIA recommends using the Linaro 7.3.1 2018.05 toolchain for L4T 32.1
Download the pre-built toolchain binaries from http://releases.linaro.org/components/toolchain/binaries/7.3-2018.05/aarch64-linux-gnu/gcc-linaro-7.3.1-2018.05-x86_64_aarch64-linux-gnu.tar.xz
$ mkdir $HOME/l4t-gcc
$ cd $HOME/l4t-gcc
$ wget http://releases.linaro.org/components/toolchain/binaries/7.3-2018.05/aarch64-linux-gnu/gcc-linaro-7.3.1-2018.05-x86_64_aarch64-linux-gnu.tar.xz
Execute the following command to extract the toolchain:
tar -xvf gcc-linaro-7.3.1-2018.05-x86_64_aarch64-linux-gnu.tar.xz
3. Download the kernel sources
Download the kernel source files and then manually extract them.
$ wget https://developer.download.nvidia.com/embedded/L4T/r32_Release_v1.0/jax-tx2/BSP/JAX-TX2-public_sources.tbz2
$ tar -xvf JAX-TX2-public_sources.tbz2
$ cd public_sources/
$ JETSON_TX2_KERNEL_SOURCE=$(pwd)
$ tar -xvf kernel_src.tbz2
4. Apply driver patches
RidgeRun provides the required patches (usually by email) to update the kernel source and add support for the ov5647 camera driver. Once the patches file was received, apply them by running the following commands:
$ mv 4.2_j120_ov5647_v0.1.0.tar.gz $JETSON_TX2_KERNEL_SOURCE
$ cd $JETSON_TX2_KERNEL_SOURCE
$ tar -xvf 4.2_j120_ov5647_v0.1.0.tar.gz
$ quilt push
5. Compile kernel and device tree
Follow the steps:
$ cd $JETSON_TX2_KERNEL_SOURCE
$ CROSS_COMPILE=$HOME/l4t-gcc/gcc-linaro-7.3.1-2018.05-x86_64_aarch64-linux-gnu/bin/aarch64-linux-gnu-
$ KERNEL_OUT=$JETSON_TX2_KERNEL_SOURCE/build
$ KERNEL_MODULES_OUT=$JETSON_TX2_KERNEL_SOURCE/modules
$ make -C kernel/kernel-4.9/ ARCH=arm64 O=$KERNEL_OUT tegra_defconfig

$ make -C kernel/kernel-4.9/ ARCH=arm64 O=$KERNEL_OUT CROSS_COMPILE=${CROSS_COMPILE} -j6 Image    # Compile kernel image
$ make -C kernel/kernel-4.9/ ARCH=arm64 O=$KERNEL_OUT CROSS_COMPILE=${CROSS_COMPILE} -j6 dtbs     # Compile device tree
$ make -C kernel/kernel-4.9/ ARCH=arm64 O=$KERNEL_OUT CROSS_COMPILE=${CROSS_COMPILE} -j6 modules  # Compile modules
$ make -C kernel/kernel-4.9/ ARCH=arm64 O=$KERNEL_OUT modules_install INSTALL_MOD_PATH=$KERNEL_MODULES_OUT
6. Flash Jetson TX2
This guide assumes that the user already has JetPack 4.2 installed. This link contains details about how to install JetPack 4.2: https://docs.nvidia.com/sdk-manager/download-run-sdkm/index.html
JETPACK_4_2 contains the directory where JetPack 4.2 was installed. For example.
export JETPACK_4_2=$HOME/JetPack-L4T-4.2
Make sure the Jetson TX2 is in recovery mode.
$ cd ${JETPACK_4_2}/JetPack_4.2_Linux_P3310/Linux_for_Tegra
# Copy kernel generated
$ cp $JETSON_TX2_KERNEL_SOURCE/build/arch/arm64/boot/Image kernel/
# Copy device tree generated
$ cp $JETSON_TX2_KERNEL_SOURCE/build/arch/arm64/boot/dts/tegra186-quill-p3310-1000-c03-00-base.dtb kernel/dtb/
# Copy new modules
$ sudo cp -a $JETSON_TX2_KERNEL_SOURCE/modules/lib rootfs/
# Flash memory
$ sudo ./flash.sh jetson-tx2 mmcblk0p1
Using the driver (GStreamer examples)
- Capture at 1080p@30fps
DISPLAY=:0 gst-launch-1.0 nvarguscamerasrc sensor-id=0 ! 'video/x-raw(memory:NVMM), width=(int)1920, height=(int)1080, format=(string)NV12, framerate=(fraction)30/1' ! nvvidconv ! queue ! ximagesink
- Capture at 720p@30fps
DISPLAY=:0 gst-launch-1.0 nvarguscamerasrc sensor-id=0 ! 'video/x-raw(memory:NVMM), width=(int)1280, height=(int)720, format=(string)NV12, framerate=(fraction)30/1' ! nvvidconv ! queue ! ximagesink
|
RidgeRun Resources | |||||||||||||||||||||||||||||||||||||||||||||||||||||||
| |||||||||||||||||||||||||||||||||||||||||||||||||||||||
|
|||||||||||||||||||||||||||||||||||||||||||||||||||||||
| Visit our Main Website for the RidgeRun Products and Online Store. RidgeRun Engineering informations are available in RidgeRun Professional Services, RidgeRun Subscription Model and Client Engagement Process wiki pages. Please email to support@ridgerun.com for technical questions and contactus@ridgerun.com for other queries. Contact details for sponsoring the RidgeRun GStreamer projects are available in Sponsor Projects page. |  
|

