Difference between revisions of "Installing Jetpack 3.0"
(→Installing Jetpack) |
m |
||
| (8 intermediate revisions by 3 users not shown) | |||
| Line 1: | Line 1: | ||
| − | = Installing Jetpack = | + | <seo title="Installing Jetpack 3.0 | NVIDIA SDK Manager | RidgeRun Developer" titlemode="replace" keywords="GStreamer, Linux SDK, Linux BSP, Embedded Linux, Device Drivers, NVIDIA, Jetson, Jetson TX1, Jetson TX2, Xavier, NVIDIA Jetson Xavier, NVIDIA Jetson Xavier NX, Jetson Xavier, Jetson Xavier NX, Jetson Nano, Embedded Linux driver development, Linux Software development, Embedded Linux SDK, Embedded Linux Application development, GStreamer Multimedia Framework, JetPack 4.2, JetPack, NVIDIA SDK Manager, SDK Manager, JetPack for Jetson AGX Xaver, NVIDIA SDK, NVIDIA Software Development Kit" description="This wiki document contains helpful instructions and diagrams for installing Jetpack 3.0. Learn how to properly install Jetpack 3.0 with the help of RidgeRun Developer today."></seo> |
| − | + | <table> | |
| + | <tr> | ||
| + | <td><div class="clear; float:right">__TOC__</div></td> | ||
| + | <td> | ||
| + | {{NVIDIA Preferred Partner logo}} | ||
| + | <td> | ||
| + | <center> | ||
| + | {{ContactUs Button}} | ||
| + | </center> | ||
| + | </tr> | ||
| + | </table> | ||
| − | 2. Move binary into installation directory, we recommend /home/$USER/JetPack-L4T-3.0/ | + | == Installing Jetpack == |
| + | |||
| + | 1.Download JetPack 3.0 from https://developer.nvidia.com/embedded/downloads | ||
| + | |||
| + | 2. Move binary into the installation directory, we recommend /home/$USER/JetPack-L4T-3.0/ | ||
<pre style="background:#d6e4f1"> | <pre style="background:#d6e4f1"> | ||
| − | mkdir -p /home/$USER/JetPack-L4T- | + | mkdir -p /home/$USER/JetPack-L4T-3.0/ |
mv JetPack-L4T-3.0-linux-x64.run /home/$USER/JetPack-L4T-3.0/ | mv JetPack-L4T-3.0-linux-x64.run /home/$USER/JetPack-L4T-3.0/ | ||
</pre> | </pre> | ||
| Line 35: | Line 49: | ||
<br> | <br> | ||
| − | Jetpack | + | Jetpack requires privileges, you have to authenticate. |
[[Image:Jetpack3.0 authentication.png|thumb|center|640px|Jetpack3.0 authentication.png]] | [[Image:Jetpack3.0 authentication.png|thumb|center|640px|Jetpack3.0 authentication.png]] | ||
<div style="text-align: center;">'''Figure 3'''. Component manager</div> | <div style="text-align: center;">'''Figure 3'''. Component manager</div> | ||
| − | 5. Ridgerun recommends | + | 5. Ridgerun recommends selecting standard installation. |
[[Image:Jetpack3.0 component manager.png|thumb|center|460px|Jetpack3.0 component manager.png]] | [[Image:Jetpack3.0 component manager.png|thumb|center|460px|Jetpack3.0 component manager.png]] | ||
| Line 52: | Line 66: | ||
<br> | <br> | ||
| − | + | 7. Wait until the installation will be completed (this may take a while). | |
[[Image:Jetpack3.0 completed.png|thumb|center|455px|Jetpack3.0 completed.png]] | [[Image:Jetpack3.0 completed.png|thumb|center|455px|Jetpack3.0 completed.png]] | ||
<div style="text-align: center;">'''Figure 6'''. Installation completed</div> | <div style="text-align: center;">'''Figure 6'''. Installation completed</div> | ||
<br> | <br> | ||
| − | + | {{Ambox | |
| − | + | |type=notice | |
| − | As NVIDIA recommends Ubuntu 14.04 64bit for Jetpack installation, there is an error installing OpenCV under Ubuntu 16.04 64bit. You can disable it from Jetpack and continue installing. The issue remains the same for Jetpack 2.3 and 2.3.1 versions. | + | |issue=Installing OpenCV under Ubuntu 16.04 64bit. |
| + | |fix=As NVIDIA recommends Ubuntu 14.04 64bit for Jetpack installation, there is an error installing OpenCV under Ubuntu 16.04 64bit. You can disable it from Jetpack and continue installing. The issue remains the same for Jetpack 2.3 and 2.3.1 versions. | ||
| + | }} | ||
| + | <br> | ||
| + | <br> | ||
| + | [[Category:Jetson]][[Category:NVIDIA Xavier]][[Category:JetsonNano]][[Category:JetsonTX2]][[Category:JetsonXavierNX]] | ||
Latest revision as of 12:14, 23 August 2022
Contents |
|
|
Installing Jetpack
1.Download JetPack 3.0 from https://developer.nvidia.com/embedded/downloads
2. Move binary into the installation directory, we recommend /home/$USER/JetPack-L4T-3.0/
mkdir -p /home/$USER/JetPack-L4T-3.0/
mv JetPack-L4T-3.0-linux-x64.run /home/$USER/JetPack-L4T-3.0/
1. Set the Jetpack binary as executable and set correct permissions.
cd /home/$USER/JetPack-L4T-2.3
chmod +x JetPack-L4T-3.0-linux-x64.run
2. Install Jetpack.
./JetPack-L4T-3.0-linux-x64.run
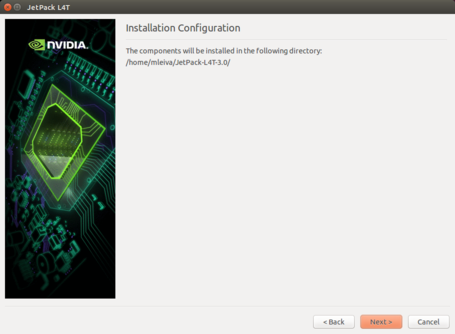
3. Press Next to start the installation.
Figure 1. Start installation
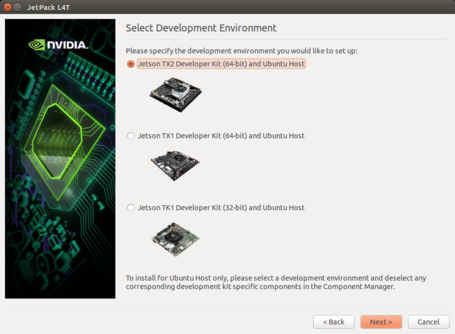
4. Select Jetson TX1 Development Kit (64-bit).
Figure 2. Select development environment
Jetpack requires privileges, you have to authenticate.
Figure 3. Component manager
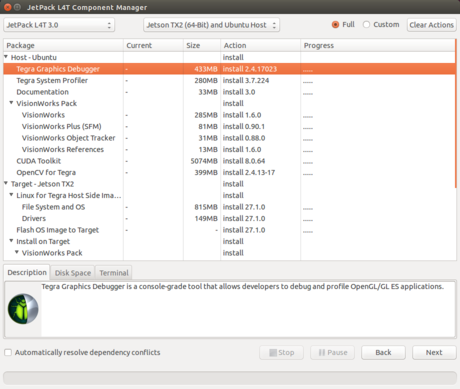
5. Ridgerun recommends selecting standard installation.
Figure 4. Component manager
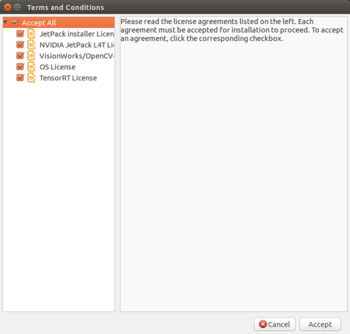
6. Accept terms and conditions.
Figure 5. Component manager
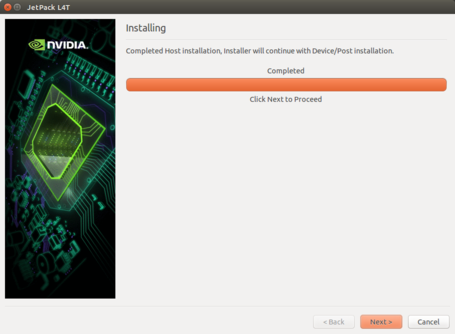
7. Wait until the installation will be completed (this may take a while).
Figure 6. Installation completed
Installing OpenCV under Ubuntu 16.04 64bit. |


