Difference between revisions of "NVIDIA Jetson Orin/JetPack 5.0.2/Getting Started/Wizard Flashing"
Jcaballero (talk | contribs) |
Jcaballero (talk | contribs) |
||
| Line 48: | Line 48: | ||
Follow the steps 1 through 3 of our [[NVIDIA_Jetson_Orin/JetPack_5.0/Getting_Started/Installing_Jetpack|Installing Jetpack]] section. If you already have Jetpack installed, this should be fairly quick. | Follow the steps 1 through 3 of our [[NVIDIA_Jetson_Orin/JetPack_5.0/Getting_Started/Installing_Jetpack|Installing Jetpack]] section. If you already have Jetpack installed, this should be fairly quick. | ||
| + | When you reach the step 3.L, you should see a window like in Figure 3. | ||
| − | |||
| − | + | [[File:Figure 3: User set up when flashing with SDK Manager.png|500px|thumb|center]] | |
| − | [[File:User set up when flashing with SDK Manager.png|500px|thumb|center]] | ||
Revision as of 14:44, 12 July 2022
NVIDIA Jetson Orin RidgeRun documentation is currently under development. |

|
This section provides a guide to flash the Jetson AGX Orin developer kit through the SDK Manager GUI in order to boot from one of the following devices: eMMc, SD card, USB drive, or NFS. If you wish to customize your OS components before flashing, check our Compiling Source Code and Flashing Board From Cmdline sections.
This section assumes that you already have followed through our Getting Started and Installing Jetpack sections. Flashing is the process of getting all the files required into the selected storage from which the Orin is going to boot. In this section, we follow three steps to flash the Orin.
Step 1: Set Board in Recovery Mode
In order to flash the Orin, we must set it in recovery mode so that it can accept the files. The procedure to put the Orin in recovery mode is:
- Start with the Jetson Orin AGX devkit turned off and disconnected from the power supply.
- Get the USB-A to USB-C cable and connect the USB-A end to your host computer (the computer where you installed Jetpack) and the USB-C end to the Orin type C port L, shown in Figure 2.
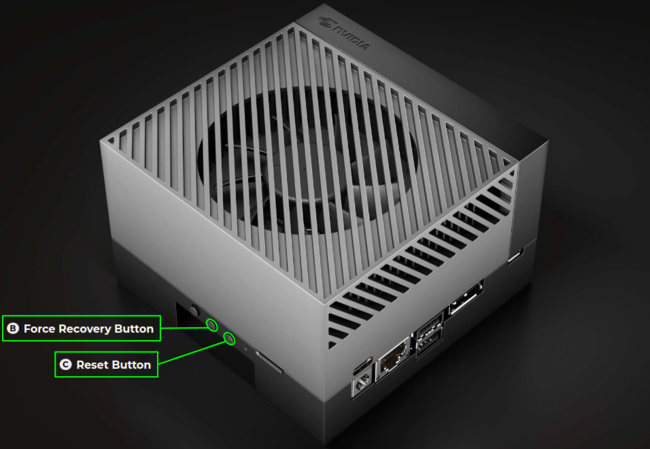
- Press and hold the FORCE RECOVERY button (B in Figure 1).
- While pressing the FORCE RECOVERY button, press and release the RESET button (C in Figure 1).
At this point, the Orin should be in recovery mode. To verify, you can run the following command on your host computer:
lsusb
If the Orin is in recovery mode, you should see a line similar to the following among the command output:
Bus 001 Device 011: ID 0955:7023 NVidia Corp
Step 2: Flash
Follow the steps 1 through 3 of our Installing Jetpack section. If you already have Jetpack installed, this should be fairly quick. When you reach the step 3.L, you should see a window like in Figure 3.
Step 3: Boot


