V4L2 FPGA - Getting the Code - Building and Installation Guide
| V4L2 FPGA |
|---|
Error creating thumbnail: Unable to save thumbnail to destination |
| Introduction |
| Getting the Code |
| Examples |
| GStreamer Pipelines |
| Supported Platforms |
| Contact Us |
Contents
Getting the Code
V4L2 FPGA is a RidgeRun's professional product under development. Contact support@ridgerun.com with any questions about release dates.
Supported Platforms
- Jetson Xavier
- i.MX 8
Building the project
The V4L2 FPGA project is divided into two building stages for supported platforms.
- FPGA firmware: stage to build the binary for the FPGA on the platform. This stage is only performed on the host machine (PC) and it requires Vivado HLS component preinstalled.
- V4L2 driver: stage to build the V4L2 driver for required platform. It might build natively on the platform or using yocto distro.
The instructions will be highlighted:
Light Blue for PC instruction
Light Green for Board instruction
FPGA Firmware
Dependencies
- Vivado HLx >= 2018.2
- Vivado HLS >= 2018.2
These tools are located at https://www.xilinx.com/support/download.html and you can follow these installation instructions.
Build
This building method is applicable for all supported platforms.
The dependencies are met follow these instructions:
1. Add Vivado executables to your path:
PATH=$PATH:/opt/Xilinx/Vivado/2018.2/bin/
2. Move the top folder for the FPGA code
cd v4l2-pcie/src/hdl/
3. Build the FPGA accelerator. Currently the project has available three accelerators: video_generator, convolution and example. All accelerators should build individually as follows:
- Video Generator
make ACCELERATOR=video_generator
- Convolution
make ACCELERATOR=convolution
- Example
make ACCELERATOR=example
V4L2 Driver
The driver allows for communication with the accelerator. This can be built either natively for the Xavier or using Yocto for the i.MX 8.
AGX Xavier
The dependencies are met to follow these instructions:
1. Get the kernel sources and by following this guide: https://devtalk.nvidia.com/default/topic/1050013/jetson-tx2/r32-1-tx2-how-can-i-build-extra-module-in-the-tegra-device/post/5332292/#5332292
2. Move the top kernel folder and build
cd v4l2-pcie/src/kernel/
make
The resulting kernel module is located on v4l2-pcie/src/kernel/xilinx/xilinx.ko
iMX8
RidgeRun offers a Yocto layer containing RidgeRun commonly used packages. You can download this package from https://github.com/RidgeRun/meta-ridgerun.
It contains a recipe to build the plugin but you need to purchase V4L2-PCIe with full source code, from: https://shop.ridgerun.com/products/fpga-v4l2-pcie-driver
- Adding meta-ridgerun to your Yocto build
First you need to copy meta-ridgerun in your sources directory:
cp -r meta-ridgerun $YOCTO_DIRECTORY/sources/
Then add the RidgeRun meta layer to your bblayers.conf file. First, go to the build configuration directory
cd $YOCTO_DIRECTORY/build/conf/
Open the bblayers.conf file and add the RidgeRun meta layer path $YOCTO_DIRECTORY/sources/meta-ridgerun to BBLAYERS
- Once you have access to the repository, please open pcie-fpga-v4l2_0.1.0.bb in $YOCTO_DIRECTORY/sources/meta-ridgerun/recipes-kernel/pcie-fpga-v4l2/
- Modify the following line in SRC_URI with the correct v4l2-fpga URL by changing <Customer-Directory> with your own.
SRC_URI = " git://git@gitlab.com/RidgeRun/orders/<Customer-Directory>/pcie-fpga-v4l2.git;protocol=ssh;branch=${SRCBRANCH}"
- Make sure you have added your ssh key to your GitLab account. For more information: SSH Information
- Finally build the recipe:
bitbake pcie-fpga-v4l2
The resulting kernel module is located at build/tmp/work/imx8mqevk-poky-linux/pcie-fpga-v4l2/0.1.0-r0/image/.
- You can also build the complete image using the command
bitbake fsl-image-multimedia -k
This will generate a the imx8evq/build/tmp/deploy/images/imx8mqevk/fsl-image-multimedia-imx8mqevk-20190614130445.rootfs.sdcard.bz2 file.
- SSH Information
The recipe will fetch the repository using your ssh key, thus it's necessary to add the key in Gitlab page.
For adding it, go to Settings->SSH Keys and add your key, if don't have one you can find there a link about how to generate it.
SSH Issue
If GitLab key hasn't added to your list of known hosts on the PC, you will have fetch errors when trying to build V4L2-FPGA recipe.
One easy way to add the key is when cloning the repository for the first time from GitLab, it will ask if you want to add the key to your list of known hosts.
Example:
git clone git@gitlab.com:RidgeRun/orders/<Customer-Directory>/pcie-fpga-v4l2.git
Installing
The V4L2 FPGA installation has two main steps for supported platforms.
- FPGA firmware: flash the binary on the FPGA on the platform.
- V4L2 driver: install the driver (xilinx.ko file) for each specific platform.
The instructions will be highlighted:
Light Blue for PC instruction
Light Green for Board instruction
FPGA firmware
AGC Xavier
Programming remotely with XVC
- Run these commands to build the program
1. Install xvcd tool from Xilinx to flash the firmware on the FPGA.
- Install dependencies
sudo add-apt-repository main
sudo add-apt-repository universe
sudo add-apt-repository restricted
sudo add-apt-repository multiverse
sudo apt-get update
sudo apt -y install libftdi-dev
- Pull the
xvcdtool
git clone https://github.com/RHSResearchLLC/xvcd.git && cd xvcd
- Patch the
linux/src/xvcd.cfile with the following code
@@ -292,7 +292,7 @@ int main(int argc, char **argv)
                return 1;
        }

-       if (listen(s, 0) < 0)
+       if (listen(s, 5) < 0)
        {
                perror("listen");
                return 1;
- Building the
xvcdtool
cd linux/src
make
- Running
xvcdtool
sudo ./xvcd -P 0x6015
2. Transfer the firmware to the platform using Vivado GUI on the host machine.
- Go to
hdl_wrapperdirectory in accelerator code:
cd v4l2-fpga/src/hdl/xilinx/${ACCELERATOR}/hdl_wrapper
- Start Vivado GUI
vivado hdl_wrapper.xpr
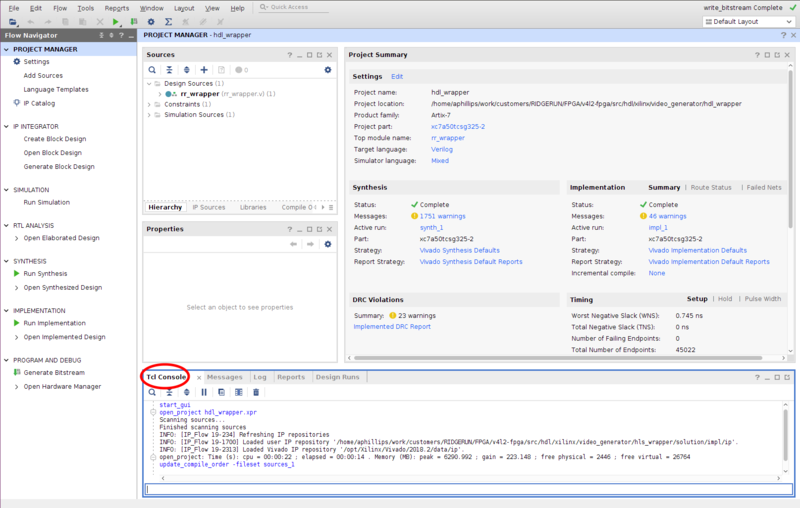
- Go to
Tcl Console
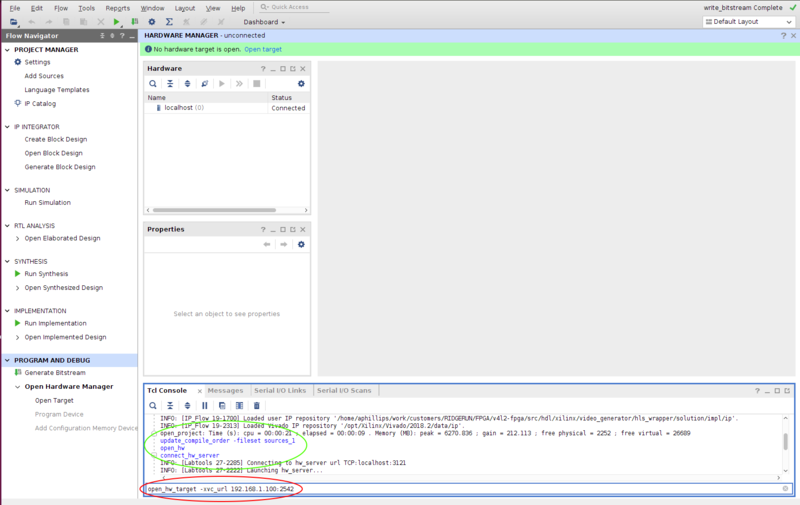
- Run the below commands on the console as shown in Figure 2.
open_hw
connect_hw_server
open_hw_target -xvc_url <TARGET_IP>:2542
Replace the <TARGET_IP> by your target IP on the network. Afterward, choose the .bit generated in 4. and proceed to flash the FPGA.
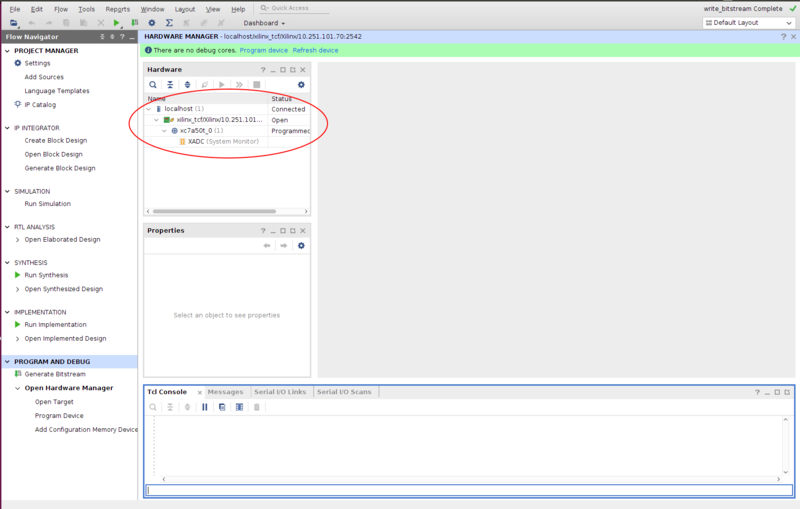
- Verify the connection had been successful as shown in Figure 3.
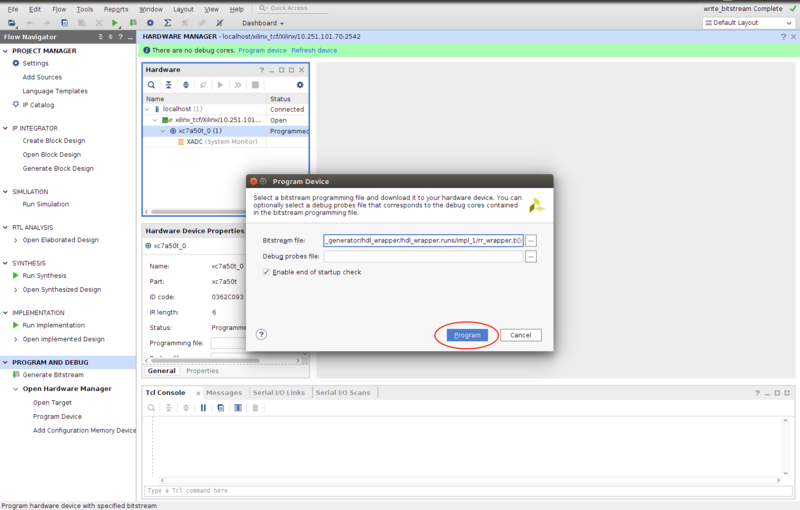
- Go to the Hardware Panel, right click on device name xc7a50t_0 and select the Program Device
- Program the FPGA device as shown in Figura 4.
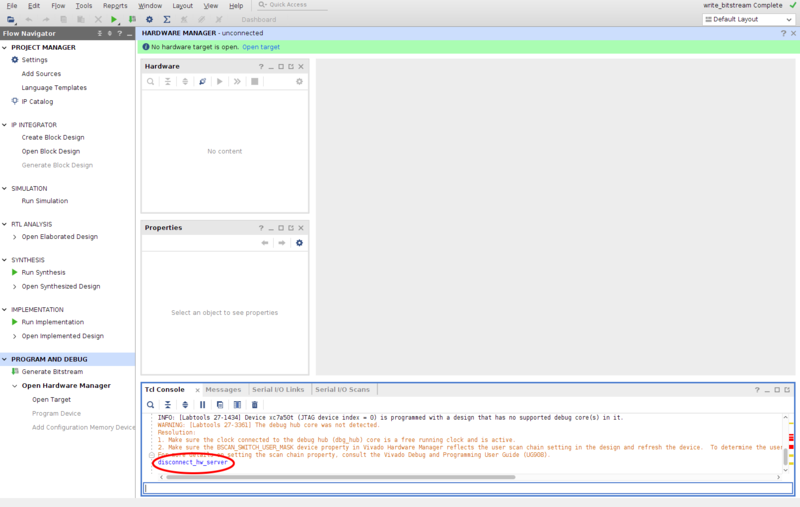
- After finishing to program the device, run the below command on Tcl Console to disconnect the interface as shown in Figure 5.
disconnect_hw_server
V4L2 driver
AGC Xavier
- Copy the
.koto your platform - Installing using the following command:
sudo insmod xilinx.ko
iMX8
Follow the instructions here: https://developer.ridgerun.com/wiki/index.php?title=IMX8/iMX8MEVK/Yocto/Installing_an_Image

