Difference between revisions of "IMX8/Nitrogen8M/Getting Started/Selecting Boot Options"
(→Boot Loading Options) |
m |
||
| (8 intermediate revisions by 3 users not shown) | |||
| Line 1: | Line 1: | ||
| − | <noinclude>{{IMX8/Head}}</noinclude> | + | <noinclude>{{IMX8/Head|previous=Nitrogen8M/Getting Started|next=Nitrogen8M/Getting Started/System Setup|metakeywords=carrier,carrier board,base board,SOM,System on Module,Boundary Devices,Nitrogen8M,configure,configure host machine,boot configuration,emmc boot,usb boot,advanced boot}}</noinclude> |
__TOC__ | __TOC__ | ||
==Boot Loading Options== | ==Boot Loading Options== | ||
| − | The Nitrogen8M provides a switch in order to set the boot configurations according to your needs. | + | The Nitrogen8M provides a switch in order to set the boot configurations according to your needs. |
| − | + | This switch allows configuring the boot source by selecting one of the following options: | |
| − | |||
| − | This switch allows | ||
*Serial Downloader: The Nitrogen8M downloads a program image from a USB connection. | *Serial Downloader: The Nitrogen8M downloads a program image from a USB connection. | ||
| − | *Internal Boot: The boot mode is selected according to U-Boot, | + | *Internal Boot: The boot mode is selected according to U-Boot, and the variable '''boot_targets''' controls the boot device (EMMC or SDCARD). |
| − | In the following table you can see how to configure each boot mode. | + | In the following table, you can see how to configure each boot mode. |
{| class="wikitable" style="margin-right: auto; margin-left: auto; border: none;" | {| class="wikitable" style="margin-right: auto; margin-left: auto; border: none;" | ||
| Line 44: | Line 42: | ||
This is how the physical switch should be set in order to boot from EMMC or USB: | This is how the physical switch should be set in order to boot from EMMC or USB: | ||
| − | [[File:Nitrogen8m_boot_sw.png| | + | [[File:Nitrogen8m_boot_sw.png|400px|center|Boot switch on Nitrogen8M]] |
==EMMC== | ==EMMC== | ||
The EMMC device is the default boot device chosen by U-Boot, this memory is preloaded with Android 8.1. | The EMMC device is the default boot device chosen by U-Boot, this memory is preloaded with Android 8.1. | ||
| + | |||
| + | Just in case, follow the instructions to set the EMMC as a boot device. | ||
| + | |||
| + | Instructions to set up the EMMC Boot from U-Boot: | ||
| + | * Connect the Nitrogen8M to a host machine with the Serial Console Cable. | ||
| + | * Start any serial console (i.e minicom or term). | ||
| + | * Power on the board, the console will display the U-boot start-up screen. | ||
| + | * Press any key on your keyboard to stop the boot sequence, this will display the U-Boot console. | ||
| + | * Change the Boot Device with the following command: | ||
| + | <pre> | ||
| + | setenv boot_targets mmc0 | ||
| + | </pre> | ||
| + | * If you do not want to repeat this process, you can save the selected Boot Device with this command: | ||
| + | <pre> | ||
| + | saveenv | ||
| + | </pre> | ||
| + | * Continue the Boot sequence by typing the next command: | ||
| + | <pre> | ||
| + | boot | ||
| + | </pre> | ||
| + | |||
| + | After the previous instructions, the board will boot from the EMMC memory. | ||
== USB Boot == | == USB Boot == | ||
| Line 54: | Line 74: | ||
This Boot option also requires a Bootable USB stick and a Serial Console Cable. | This Boot option also requires a Bootable USB stick and a Serial Console Cable. | ||
| − | Instructions to | + | Instructions to set up the USB Boot from U-Boot: |
* Connect the Nitrogen8M to a host machine with the Serial Console Cable. | * Connect the Nitrogen8M to a host machine with the Serial Console Cable. | ||
* Start any serial console (i.e minicom or term). | * Start any serial console (i.e minicom or term). | ||
| Line 72: | Line 92: | ||
</pre> | </pre> | ||
| − | After the previous instructions, the board will boot from the USB stick | + | After the previous instructions, the board will boot from the USB stick. |
==Advanced Boot Options== | ==Advanced Boot Options== | ||
You can load the kernel and filesystem by using advanced methods. Please refer the [[IMX8/Nitrogen8M/Getting_Started/Advanced_Boot_Options | Advanced Boot Options]] page for more information. | You can load the kernel and filesystem by using advanced methods. Please refer the [[IMX8/Nitrogen8M/Getting_Started/Advanced_Boot_Options | Advanced Boot Options]] page for more information. | ||
| − | <noinclude>{{IMX8/Foot|Nitrogen8M/Getting Started|Nitrogen8M/Getting Started/ | + | <noinclude>{{IMX8/Foot|Nitrogen8M/Getting Started|Nitrogen8M/Getting Started/System Setup}}</noinclude> |
Latest revision as of 12:13, 9 March 2023
|
Contents
Boot Loading Options
The Nitrogen8M provides a switch in order to set the boot configurations according to your needs.
This switch allows configuring the boot source by selecting one of the following options:
- Serial Downloader: The Nitrogen8M downloads a program image from a USB connection.
- Internal Boot: The boot mode is selected according to U-Boot, and the variable boot_targets controls the boot device (EMMC or SDCARD).
In the following table, you can see how to configure each boot mode.
| Boot Source | PIN |
|---|---|
| Serial Downloader | ON |
| Internal Boot | OFF |
The bootable source code is selected from the switch and U-Boot, the complete information is presented in the following table:
| BOOT Source | PIN | boot_targets |
|---|---|---|
| Serial Downloader | ON | --- |
| Boot from EMMC | OFF | mmc0 |
| Boot from USB | OFF | usb0 |
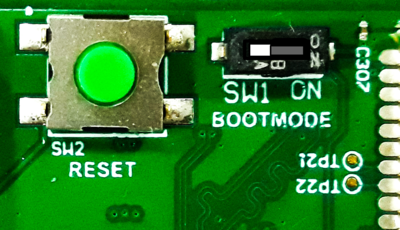
BOOT Switch Configuration for EMMC and USB
This is how the physical switch should be set in order to boot from EMMC or USB:
EMMC
The EMMC device is the default boot device chosen by U-Boot, this memory is preloaded with Android 8.1.
Just in case, follow the instructions to set the EMMC as a boot device.
Instructions to set up the EMMC Boot from U-Boot:
- Connect the Nitrogen8M to a host machine with the Serial Console Cable.
- Start any serial console (i.e minicom or term).
- Power on the board, the console will display the U-boot start-up screen.
- Press any key on your keyboard to stop the boot sequence, this will display the U-Boot console.
- Change the Boot Device with the following command:
setenv boot_targets mmc0
- If you do not want to repeat this process, you can save the selected Boot Device with this command:
saveenv
- Continue the Boot sequence by typing the next command:
boot
After the previous instructions, the board will boot from the EMMC memory.
USB Boot
This Boot option also requires a Bootable USB stick and a Serial Console Cable.
Instructions to set up the USB Boot from U-Boot:
- Connect the Nitrogen8M to a host machine with the Serial Console Cable.
- Start any serial console (i.e minicom or term).
- Power on the board, the console will display the U-boot start-up screen.
- Press any key on your keyboard to stop the boot sequence, this will display the U-Boot console.
- Change the Boot Device with the following command:
setenv boot_targets usb0
- If you do not want to repeat this process, you can save the selected Boot Device with this command:
saveenv
- Continue the Boot sequence by typing the next command:
boot
After the previous instructions, the board will boot from the USB stick.
Advanced Boot Options
You can load the kernel and filesystem by using advanced methods. Please refer the Advanced Boot Options page for more information.


