Getting started with TI Jacinto 7 Edge AI - Demos - Python Demos - Classification
Getting started with TI Jacinto 7 Edge AI RidgeRun documentation is currently under development. |
| Getting started with TI Jacinto 7 Edge AI | ||||||
|---|---|---|---|---|---|---|
  | ||||||
| Introduction | ||||||
|
|
||||||
| GStreamer | ||||||
|
|
||||||
| Demos | ||||||
|
||||||
| Reference Documentation | ||||||
| Contact Us |
Contents
Classification demo
Requirements
- Sample images in the J7's /opt/edge_ai_apps/data/images/ directory.
Run the classification demo example
- Navigate to the python apps directory:
cd /opt/edge_ai_apps/apps_python
- Create a directory to store the output files:
mkdir out
- Run the demo:
./image_classification.py -m ../models/classification/TFL-CL-002-SqueezeNet/ -i ../data/images/%04d.jpg -o out/classification_%d.jpg
Note: the %d above will be replaced by sequential numbers starting from 0. |
- The demo will start running. The command line will look something like the following:
- After all frames are done processing, the command line should display something like the following:
APP: Init ... !!!
MEM: Init ... !!!
MEM: Initialized DMA HEAP (fd=4) !!!
MEM: Init ... Done !!!
IPC: Init ... !!!
IPC: Init ... Done !!!
REMOTE_SERVICE: Init ... !!!
REMOTE_SERVICE: Init ... Done !!!
 20428.579591 s: GTC Frequency = 200 MHz
APP: Init ... Done !!!
 20428.579825 s:  VX_ZONE_INIT:Enabled
 20428.579893 s:  VX_ZONE_ERROR:Enabled
 20428.579956 s:  VX_ZONE_WARNING:Enabled
 20428.580560 s:  VX_ZONE_INIT:[tivxInit:71] Initialization Done !!!
 20428.580907 s:  VX_ZONE_INIT:[tivxHostInit:48] Initialization Done for HOST !!!

 Number of subgraphs:1 , 40 nodes delegated out of 40 nodes

[UTILS] gst_src_cmd = multifilesrc location=../data/images/%04d.jpg loop=false index=0 caps=image/jpeg,framerate=12/1  ! jpegdec  ! videoscale ! video/x-raw, width=1280, height=720 ! videoconvert ! appsink drop=true max-buffers=2
[UTILS] Gstreamer source is opened!
[UTILS] gst_sink_cmd = appsrc format=GST_FORMAT_TIME block=true ! videoscale !  jpegenc !  multifilesink location=out/classification_%d.jpg
[UTILS] Gstreamer sink is opened!
[UTILS] Starting pipeline thread
- Navigate to the out directory:
cd out
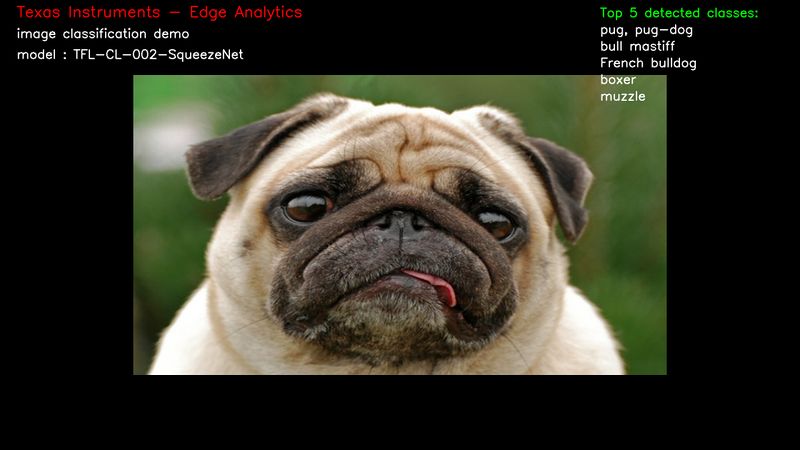
There should be several images named classification_<number>.jpg as a result of the classification model.
- Figure 2 shows an example of how these images should look like:

There are multiple input and output configurations available. In this example demo an image input and an image output were specified.
For more information about configuration arguments please refer to the Configuration arguments section below.
Configuration arguments
  -h, --help            show this help message and exit
  -m MODEL, --model MODEL
                    Path to model directory (Required)
                        ex: ./image_classification.py --model ../models/classification/$(model_dir)
  -i INPUT, --input INPUT
                    Source to gst pipeline camera or file
                        ex:  --input v4l2 - for camera
                             --input ./images/img_%02d.jpg - for images
                                   printf style formating will be used to get file names
                             --input ./video/in.avi - for video input
                             default: v4l2
  -o OUTPUT, --output OUTPUT
                    Set gst pipeline output display or file
                        ex:  --output kmssink - for display
                             --output ./output/out_%02d.jpg - for images
                             --output ./output/out.avi - for video output
                             default: kmssink
  -d DEVICE, --device DEVICE
                    Device name for camera input
                    default: /dev/video2
  -c CONNECTOR, --connector CONNECTOR
                    Connector id to select output display
                    default: 39
  -u INDEX, --index INDEX
                    Start index for multiple file input output
                    default: 0
  -f FPS, --fps FPS     Framerate of gstreamer pipeline for image input
                    default: 1 for display and video output 12 for image output
  -n, --no-curses       Disable curses report
                    default: Disabled
Note: if live video from a camera is specified, please refer to the Change the default framerate (optional) section in case the camera used does not support a framerate of 30 fps. If the GStreamer pipeline does not open, this could be the case. |
Change the default framerate (optional)
By default, the GStreamer pipeline runs with a 30/1 framerate. If the camera used does not support this framerate or if the framerate needs to change, follow these steps:
1. Navigate to the python apps directory:
cd /opt/edge_ai_apps/apps_python
2. Open the utils.py file with any text editor and look for these lines:
    if (source == 'camera'):
        source_cmd = 'v4l2src ' + \
                              ('device=' + args.device if args.device else '')
        source_cmd = source_cmd + ' io-mode=2 ! ' + \
                  'image/jpeg, width=1280, height=720, framerate=30/1 ! ' + \
                  'jpegdec !'
3. Add custom framerate support by modifying the code lines like so:
    if (source == 'camera'):
        source_cmd = 'v4l2src ' + \
                              ('device=' + args.device if args.device else '')
        source_cmd = source_cmd + ' io-mode=2 ! ' + \
                  'image/jpeg, width=1280, height=720, framerate=' + str(args.fps) + '/1 ! ' + \
                  'jpegdec !''
IMPORTANT: since we are adding an option to change the default framerate, the demo has to be run with the -f option: |
./image_classification.py --device /dev/video0 -m ../models/classification/TFL-CL-002-SqueezeNet/ -f 60 -o out/classification_%d.jpg
In the above example, the demo was run with a framerate of 60 fps.
