Getting started with TI Jacinto 7 Edge AI - Introduction - Getting Started
Contents
Overview
The Jacinto 7 is the Texas Instruments multi-part evaluation platform that lets you evaluate applications on Vision Analytics and Networking in the Automotive and Industrial markets. It is done with the EVM supported SDK-Vision Processor, that includes foundational Drivers, Compute and Vision Kernels, and example application Frameworks that demonstrate you how to take advantage of the powerful, heterogeneous Jacinto 7 architecture. The Jacinto 7 it's designed to lower overall evaluation costs with speed up development and reduce time-to-market.
Features:
- UFS flash memory, 32GByte, 2Lane, Gear3
- USB3.1 type C interface, support DFP, DRP, UFP modes
- Display port, up to 4K resolution with MST support
- 2x PCIe card slot, 1x PCIe M.2 slot (M‐Key), all Gen3
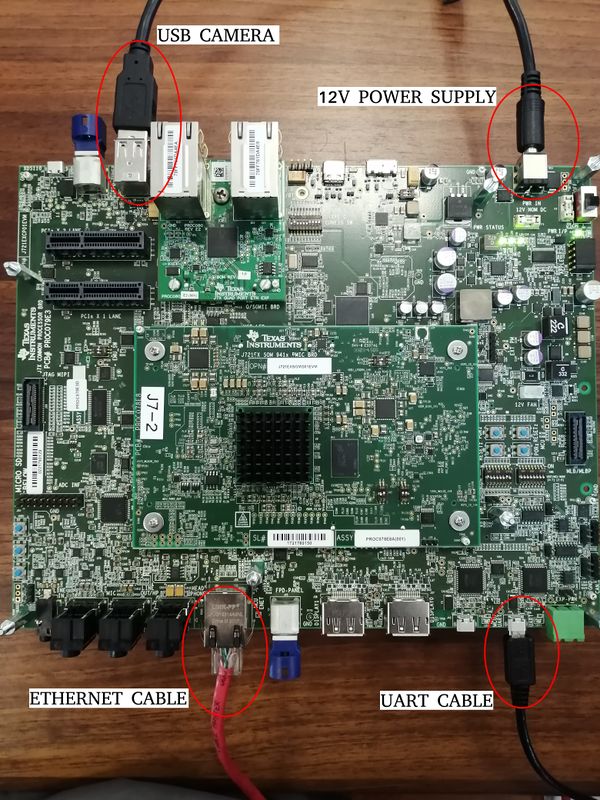
The EVM setup
Requirements:
- TDA4VM/J7ES EVM
- 12 V power suppy
- Ethernet cable
- UART cable
- Minimum 16GB high performance SD card
- USB camera
- Full HD eDP display
The EVM connections
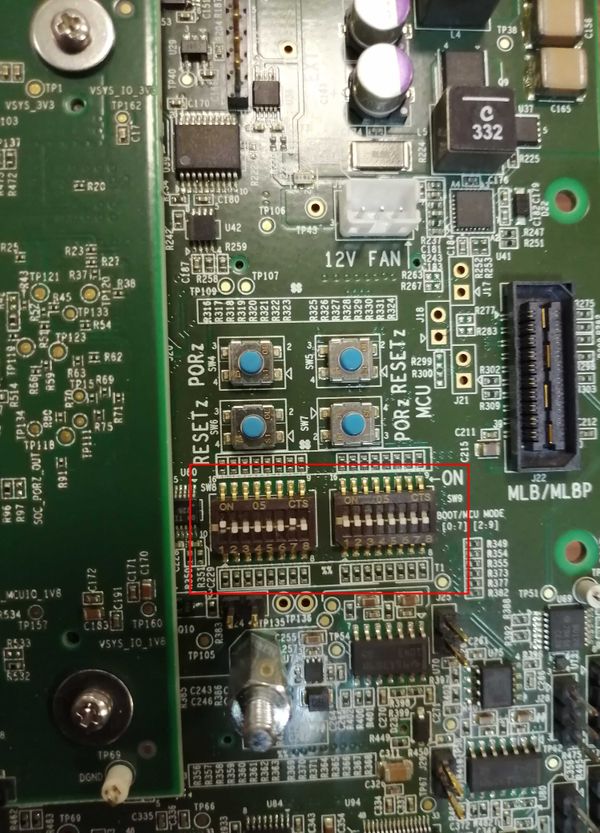
The switches
In order to allow the EVM to boot, please follow this switches configuration:
Build & install the Linux SDK
Linux SDK
Download the Linux SDK
# Get the SDK installer
$ wget https://software-dl.ti.com/jacinto7/esd/processor-sdk-linux-jacinto7/07_03_00_05/exports/ti-processor-sdk-linux-j7-evm-07_03_00_05-Linux-x86-Install.bin

# Give the SDK execution permissions
$ chmod +x ti-processor-sdk-linux-j7-evm-07_03_00_05-Linux-x86-Install.bin

# Execute the SDK installer
$ ./ti-processor-sdk-linux-j7-evm-07_03_00_05-Linux-x86-Install.bin
Follow the SDK installer instructions, and at the "Choose Destination Location", add the directory with the SDK name at the current directory:
# ti-processor-sdk-linux-j7-evm-07_03_00_05-linux
# Enter the SDK workspace and run the setup script
$ cd ti-processor-sdk-linux-j7-evm-07_03_00_05-linux/
$ ./setup.sh
Flash the SD card
# Detect the SD card device on your computer: Plug out and plug in the SD card with this command running
$ watch ls /dev/*

# Select the SD device, and flash
$ SD_DEVICE=/dev/mmcblk0
$ sudo bin/mksdboot.sh --device $SD_DEVICE --sdk .
NFS bootup (optional)
Requirements
- TI Jacinto 7 board connected via USB and Ethernet to the PC
- DHCP configured to share network on the Ethernet interface
- Connected SD card with a Jacinto 7 image (or at least the boot partition with the Bootloader)
Dependencies to meet
$ sudo apt install nfs-kernel-server
$ sudo apt install xinetd
Setups
Find the USB port device
The USB device can be found this way:
# Plug in and plug out the USB cable
$ watch ls /dev/tty*
/dev/ttyUSB0
Find the server IP (the IP of your computer)
The computer IP could be find out with this command, at the first IP:
$ hostname -I
Set the TFTP server directory
$ vi /etc/default/tftpd-hpa
# [Update this variable]
# TFTP_DIRECTORY="/tftpboot"
Configure the Ethernet interface
Make sure it is sharing Internet. It will allow the DHCP to assign and IP the FTP server to establish the files transfers.
$ nm-connection-editor
The script execution
$ sudo ./setup.sh
Proceed with the SDK setup script and reach out to the point the script stands for the Minicom (serial communication application) setup for SDK development.
The script execution would look like the following:
# Which serial port do you want to use with minicom?
$ [ /dev/ttyS0 ] /dev/ttyUSB0
--------------------------------------------------------------------------------
This step will set up the u-boot variables for booting the EVM.
--------------------------------------------------------------------------------
Autodetected the following ip address of your host, correct it if necessary
[ 192.168.1.55
172.17.0.1 ] 192.168.1.55

Select Linux kernel location:
 1: TFTP
 2: SD card

[ 1 ] 1

Select root file system location:
 1: NFS
 2: SD card

[ 1 ] 1

Available kernel images in /tftproot:
    Image-j7-evm.bin
    k3-j721e-common-proc-board-infotainment.dtbo
    k3-j721e-common-proc-board-jailhouse.dtbo
    k3-j721e-common-proc-board.dtb
    k3-j721e-edgeai-apps.dtbo
    k3-j721e-pcie-backplane.dtbo
    k3-j721e-proc-board-tps65917.dtb
    k3-j721e-vision-apps.dtbo
    ti-fs-firmware-j721e-gp.bin
    ti-fs-firmware-j721e-hs-cert.bin
    ti-fs-firmware-j721e-hs-enc.bin

Which kernel image do you want to boot from TFTP?
[ Image-j7-evm.bin ]
--------------------------------------------------------------------------------
Would you like to create a minicom script with the above parameters (y/n)?
[ y ] y

--------------------------------------------------------------------------------
Would you like to run the setup script now (y/n)?

Please connect the ethernet cable as described in the Quick Start Guide.
Once answering 'y' on the prompt below, you will have 300 seconds to connect
the board and power cycle it before the setup times out

After successfully executing this script, your EVM will be set up. You will be
able to connect to it by executing 'minicom -w' or if you prefer a windows host
you can set up Tera Term as explained in the Software Developer's Guide.
If you connect minicom or Tera Term and power cycle the board Linux will boot.

[ y ] y

Welcome to minicom 2.7.1

OPTIONS: I18n
Compiled on Aug 13 2017, 15:25:34.
Port /dev/ttyUSB0, 16:47:36

# [At this very point restart the board with the power switch.]
The result it's a Minicom script with the Bootloader sequence and configuration to boot the TI J7 via the NFS/TFTP.
Test the NFS boot
You can reconnect to the board using the created Minicom script, and it would be this way:
# Connect to the board
$ sudo minicom -S bin/setupBoard.minicom

# [Restart the board with the power switch]
At the SDK root path, touch a file on the NFS'd filesystem:
$ touch targetNFS/home/1234567
At the J7 NFS session, the file will be found:
$ ls /home/
1234567 root
Install the RTOS Linux SDK
The RTOS Linux SDK
Download the RTOS image
# Get the RTOS image
$ wget https://software-dl.ti.com/jacinto7/esd/processor-sdk-rtos-jacinto7/07_03_00_07/exports/ti-processor-sdk-rtos-j721e-evm-07_03_00_07-prebuilt.tar.gz
$ tar -xvf ti-processor-sdk-rtos-j721e-evm-07_03_00_07-prebuilt.tar.gz
$ cd ti-processor-sdk-rtos-j721e-evm-07_03_00_07-prebuilt
Flash the SD card
Insert a formated SD card, and follow this instructions:
$ watch ls /dev/*

# Select the SD device, and flash
$ SD_DEVICE=/dev/mmcblk0
$ sudo ./mk-linux-card.sh $SD_DEVICE
$ ./install_to_sd_card.sh

# Install optional extra dataset in the file system partition
$ ./install_data_set_to_sd_card.sh psdk_rtos_ti_data_set_07_03_00.tar.gz
$ ./install_data_set_to_sd_card.sh  psdk_rtos_ti_data_set_ptk_07_01_00.tar.gz
Install the Edge AI DevKit image
The Edge AI DevKit
Download the Edge AI image
# Get the Edge AI image
$ wget https://downloads.ti.com/jacinto7/esd/edgeai-devkit/00_04_02_23/exports/ti_edge_ai_sd_card_etcher.zip
$ unzip ti_edge_ai_sd_card_etcher.zip
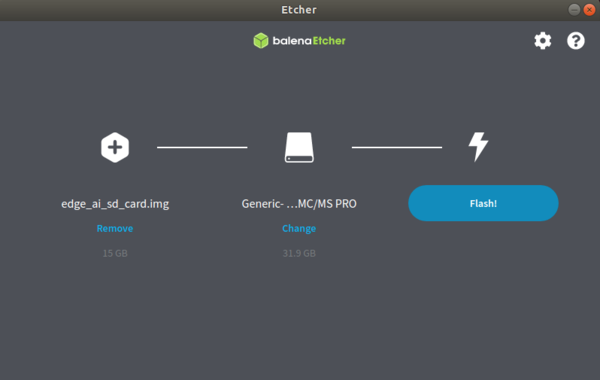
Flash the SD card
The SD card image can be flashed with Balena Etcher.
You're ready to go with the Edge AI Devkit.
Getting started with TI Jacinto 7 Edge AI RidgeRun documentation is currently under development. |
| Getting started with TI Jacinto 7 Edge AI | ||||||
|---|---|---|---|---|---|---|
  | ||||||
| Introduction | ||||||
|
|
||||||
| GStreamer | ||||||
|
|
||||||
| Demos | ||||||
|
||||||
| Reference Documentation | ||||||
| Contact Us |


